Create this project along with Alyssa!
Instructional video will premiere on the Museum’s YouTube Channel on Saturday, July 18 at 10 am.
Project Overview:
First, we will learn different methods of pressing flowers and leaves! After getting inspired by nature and our surroundings, we will get creative and make our own pressed flowers bookmark. Exploring nature around our homes will help everyone create their own unique floral designs!
Flower Pressing Materials – Method 1: Quick
- paper
- paper towels
- flowers
- scissors
- heavy dish (microwave safe)
Flower Pressing Materials – Method 2: Time & Patience
- two pieces of wax paper
- scissors
- flowers
- heavy book
- (and time!)
Bookmark Materials
- paper
- clear contact paper
- crayons
- yarn
- hole puncher
Key Concepts:
- Composition
- Arrangement
- Details
Step-by-step Instructions:
Method 1: Microwave (Adult supervision required)
- Look around outside your house and neighborhood to gather your flowers. Make sure you have permission to pluck or cut flowers if they’re on someone else’s property!
- Once you’ve decided on your flowers, trim the stems from each. You can save some leaves or leftover trimmings to add accents when you create your arrangement!
- Begin by folding a 9 x 12 piece of paper in half horizontally, then unfold and work flat. You will only place flowers on one side of the fold. Experiment with different ways to arrange your flowers and leaves until you find the way that you think looks the best!
- Once you are happy, you can fold the blank side over the flowers- be very careful to not disturb your design.
- Place a paper towel on top of your folded paper and put carefully in your microwave. Place a heavy microwave safe dish on top and set for about 30~60 secs (depending on the strength of your microwave).
- Take your paper out carefully and unfold. You will notice all the moisture has been drained from your flowers and they are ready for the next step!
Method 2: Book pressing
- Gather your flowers and prepare a sheet of wax paper inside the middle of a heavy book.
- Trim your flowers and arrange them on your wax paper (upside down).
- Take a second piece of wax paper and lay it on top.
- Put your book in a bookcase or lay heavier objects on top for added pressure. Let your flowers dry for one week.
Once you’re done pressing your flowers, you can frame them or continue on to make a bookmark!
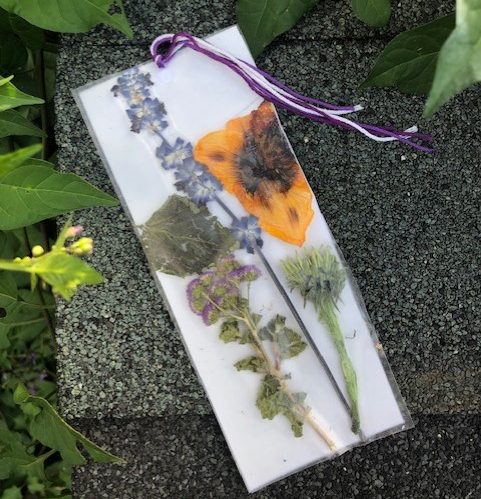
Making A Bookmark
- Cut two pieces of approximately 8” x 3” contact paper.
- Arrange your flowers on a piece of paper first to decide on your design!
- Peel one piece of contact paper and lay flat with the sticky side facing up.
- Transfer your flowers to your contact paper one by one to mimic your design.
- Peel your second piece of contact paper and line up the edges at the top and then lay it carefully on.
- Smooth out the top contact paper slowly as you work your way downwards towards the bottom edge. (going slower helps to avoid any air bubbles or wrinkles!)
- Make a tassel!
- Using a single hole punch, make a hole at the top of your bookmark.
- Pick out 2-4 pieces of yarn or string.
- String it through the hole and make a knot. Trim your tassel as you see fit and happy reading!
Share!
Please share photos of your finished works of art with us on social media and we will post some of our favorites here. And check back next week for our next project! #HeckscheratHome #MuseumfromHome